Mealworm is a food source for many pets, such as chickens, fish, birds, reptiles, and a couple of other animals. So, it is much easier and cheaper to raise them than to buy them from a pet store.
A self-sorting mealworm is perhaps the best way to go as the design saves you the stress of picking the worms from the beetles. Are you thinking about setting up your self-sorting mealworm farm?

Here is a detailed discussion of some important things you should consider.
Read on to find out.
Understanding How a Self-Sorting Mealworm Farm Works
A self-sorting mealworm farm is pretty easy to keep. To understand what you need to build and maintain an excellent self-sorting mealworm farm, it is important to understand how it works.
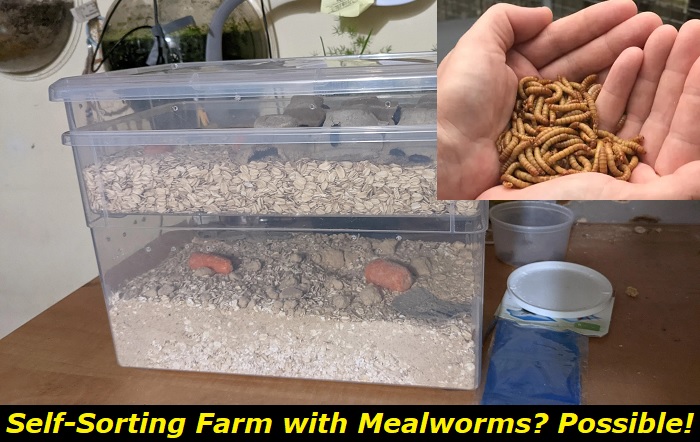
Essentially, the farm thrives on a model that allows the eggs to be effortlessly separated from the beetles after they are laid. The model’s distinctive design usually comprises two or more containers stacked together in a way that they fit into each other.
The topmost container is usually smaller than the containers to go below it. This design is essential to provide space under the smaller topmost container where the laid eggs will fall since the mealworm beetles usually burrow into the substrate bottom to lay eggs.
The topmost container will usually have a cut mesh net stapled or nailed to a wooden frame. The wooden frame will then become the base for the plastic container to hold the grains or oatmeal bedding and the mealworm beetles.
This design is the main feature of this self-sorting mealworm farm, as the beetles are kept in the topmost container while only the eggs fall into the lower collecting container.
If you use more than one container, you will need to rotate the containers to collect eggs in each container every month or thereabout. But if you use only one container, there is no reason to rotate.
Another thing to note about a self-sorting mealworm farm is that you may not get all the eggs into the lower container as some may still be in the topmost container. But you will usually get a great deal in the lower container.
With this knowledge of how a self-sorting mealworm farm works, you must consider a couple of things if you plan to set up one or more for yourself. Some of the main considerations to take into account are discussed below:
What Should You Consider in a Self-Sorting Mealworm Farm
Check out some of the main things a mealworm farmer must consider before setting up a mealworm farm.
1) Housing Material
The nature of the housing material you use is very important. You want to avoid using cardboard containers or containers made of fabric. These containers have surfaces that are easy for the worms to latch onto and climb out.
You want to choose containers that do not offer any grip on the sides for the mealworms. Containers with a very slippery surface are the best as they make it pretty difficult for the mealworms to escape.
Plastic, metal, and glass containers are the best. You can also use a wax-coated container. You want the container to be at least 3 inches deep. You also want it to have slippery sides to ensure no chance of escape.
The choice to put a lid is not optional. You must put a lid on the container for optimal humidity levels.
2) Bedding/Substrate
Unlike reptiles and amphibians, the substrate or bedding for your mealworm will also be their food source. The common choices mealworm farmers use, include grain cereals like corn meal and oatmeal.
You can also use dog food, but you want to ensure that it is finely ground to crumbs. You need it to have a consistent texture. It would be best to line the fine bedding all over the bottom of the container.
A layer of about 1 to 1.5 inches deep will work well.
No matter what your bedding choice is, it is important that you change it every few weeks. But changing all of the bedding at once is not necessary. You can change it gradually, especially the parts on which you notice mold growth.
You may also need to change it if you notice any foul smell from the bedding or a reduction in the number of grains you put in the tub.
When changing the bedding, you will need a sieve or a sifter to separate the mealworms from the grains. The sieve will also come in handy when there is another reason for you to separate the mealworms from the grains.
3) Temperature
Since you plan to breed the mealworm and multiply the number of mealworms you have in your mealworm farm, maintaining the appropriate temperature to encourage breeding is very important.
Ideally, mealworms breed at a temperature range of about 65°F to 100°F. But since the external temperature may also affect the container’s internal temperature, you may end up with a higher temperature in the tub. A high temperature will negatively impact your mealworms’ health, growth, and reproductive performance.
If you live in a hot or mild climate, keeping the tub in the garage or at normal room temperature is a ready solution to maintaining the right temperature. However, a temperature of about 80f will be ideal since you want to breed on your farm.
4) Ventilation
Ventilation is another important thing to consider in a self-sorting mealworm farm. Since you will be using a lid to cover the top tub, it is important that you make tiny holes in the top to ensure that there is ventilation in the tub.
The holes should be slim enough for air to pass through but not big enough for other insects to enter the tub. Alternatively, you can use cheesecloth as a cover instead of a plastic lid. It will keep insects out and also keep the tub aerated.
You also want to measure out the bigger tubs to see where the top smaller tub stops. After measuring, draw a line across the tub horizontally just an inch below where the smaller tub fits. Make a line of holes along that line for ventilation so that the hatched eggs can also have some fresh air.
Again, the holes mustn’t be big enough for insects to enter the tub. But they must be big enough to have air pass through them.
One way to tell when there is too much humidity in the tub is to watch out for condensation. A little bit of condensation under the lid means there is too much moisture in the tub. You want to open the lid, clean off the water and change the fruits or vegetables you use as a hydration source.
The best hydration sources are carrots or old potatoes.
If you also notice that the bedding is becoming wet or moist, you want to let some air in by reducing the humidity level in the container. You can make more holes in the lid to let in more air.
5) Feeding
As mentioned earlier, dry oatmeal or other cereal grains is the best bedding type for your mealworms. You want to spread out the fine grain on the tub at a depth of about 1-1.5 inches. This dry grain will serve as food and a substrate for your beetles and their eggs when they hatch into the larvae stage.
Moist fruits and foods are also a great way to keep them hydrated. Many mealworm farmers use old potatoes, slices of apples, and carrots to keep the beetles and larvae hydrated. Mealworm farmers mostly favor old potatoes because they dry very slowly and take a long time to mold.
It would be a mistake to leave a water bowl in the tub. Doing so will increase the chances of mold in the bedding because evaporation will increase the humidity levels in the tub.
Apart from encouraging the growth of molds in the tubs, putting a water bowl in the mealworm farm will also increase the risk of your mealworms drowning. Other than old potatoes and apple slices, you can also use vegetables to keep your mealworms hydrated.
It is important that you do not want to use fruits or vegetables that are overly soggy.
You must pay close attention to the fruit or vegetable to ensure that you do not leave them in the tub so long that they start to mold. You also want to always remember to remove the dry vegetables or fruits and replace them with fresh ones to continue keeping your mealworms hydrated.
Bottom Line
These concerns discussed above are crucial to having a successful self-sorting mealworm farm. Without paying attention to these important considerations, there is a great chance of failure.
You must ensure to use only the best materials for your farm setup. You must also ensure that all other structural designs are implemented so that your farm is successful.
- Dubia Roach Egg Sack: How To Understand if It’s Healthy? - January 2, 2023
- How To Feed African Dwarf Frog While on Vacation? - December 26, 2022
- Baytril for Bearded Dragon: Here’s What You Should Know - December 19, 2022


